The young girl could hardly wait to show me the photographs she had brought. I was doing a book signing for Something to Remember Me By. She wanted to show me photos of things she and her grandmother had done together, like playing dress-up and going to the zoo. She was especially proud of the photo of her grandmother that she had taken herself! Photos do that to young and old. They are a source of pride, enjoyment, sharing, and memories.
I think that's one of the reasons scrapbooking has become so popular in recent years. Scrapbooks record, celebrate, and connect us to the events, people, and traditions of our past and present -- and help us carry those memories into the future. They are a way to tell your life story, share special moments with those you love, and create a lasting legacy. They also speak to the visual age in which we live. We use images in our society to advertise, inform, educate, and entertain. Images draw us in. They are usually what first gets our attention when we see a printed page. They are also a key way we remember things.
Much of the information in this section is provided by Memory Makers scrapbooking magazine (www.memorymakersmagazine.com or 1-800-366-6465). Written by avid scrapbookers, each issue is filled with great information and ideas for families, seniors groups/facilities, and schools.
Scrapbooking is an activity all generations can do together to create a sense of connectedness and family history. It is an activity older adults can do quite easily, even those who may have some physical and/or cognitive limitations. For older adults in nursing homes, for example, it can be used to create a feeling of home, support a failing memory, and as a tool in reminiscing. At the other end of the age spectrum, children also enjoy scrapbooking. It's fun and educational. Scrapbooking can be used to bring any subject to life for children -- whether it's preserving family history, celebrating friendship, recording achievement, or exploring a new curriculum topic. Looking at events using a variety of mediums -- documents, letters, books, photographs -- allows children to see them from different perspectives and explore them in a richer, more thought-provoking way. Also, research shows that people take in information differently; so the child who isn't easily able to comprehend information through the written word may be able to more readily take it in through photos.
Each activity kit in the Legacy Project offers creative scrapbooking ideas, techniques, and projects. The Grandparents Day Activity Kit contains an introduction to the history of scrapbooking, information on how to sort photos, and step-by-step directions for assembling a basic scrapbook page. Some quick reminders:
- Be careful as you handle photographs. Old photos are particularly precious -- make sure your hands are clean, and touch only the corners (oil or dirt from your fingers can ruin photos). You should never have any food or drinks near photos.
- The first step in scrapbooking is organizing your photos. As you organize, try to record some notes about them. You can label photos on the back, but don't write with a ballpoint pen. Instead, use a Stablio art pencil, which you can pick up in an art or scrapbooking store. These pencils leave less of an impression than regular pencils. When you write, make sure you don't press too hard and don't write in areas where people's faces are. A better idea is to use a notebook to jot down names, dates, locations, and recollections.
- Never store piles of photos on top of each other. This is especially important if you've written anything on the back (the writing can come off and ruin your photos). Also, keep your photos where you keep people in your home -- away from the temperature extremes of an attic or the dampness of a basement.
- Use proper scrapbooking supplies. For example, the acid in many pens and photo albums can yellow and deteriorate photos and papers, so you need to buy ones that are appropriate. Decorative scrapbooking papers are available in a wide variety of eye-catching colors and patterns. Look for papers that are acid- and lignin-free. Never fix a photo with tape -- it cracks and leaves a residue. Use photo-safe glues, tapes, and mounting corners to secure photos.
- When you're laying out a page, you can use just a single, evocative photo; do an arrangement with two or three photos; or use several very small photos. Choose one photo as your focal point. It should have strong visual interest. Then think about how you might want to arrange the other photos you've chosen around it to tell a story.
- Journaling is THE most important step for a good scrapbook page. A page isn't complete without a few notes describing what's happening or your thoughts and feelings. There are three basic approaches to journaling: bullets that supply only the basic information in fact form (i.e. who, what, where, when, how, why); captions that are made up of complete sentences and allow for more creative expression; and storytelling, which is the most evocative approach and delves into the history of the photo.
There are two photo-oriented books I'd like to highly recommend this holiday season. In many ways, they capture the season's spirit. The first is Architects of Peace: Visions of Hope in Words and Images by Michael Collopy. This is a stunning coffee table book that eloquently speaks to our current times. It profiles 75 of the world's greatest peacemakers -- politicians, scientists, spiritual leaders, artists, and activists. Portraits by a noted photographer are brought together with essays written by the individuals profiled. Scrapbooks are all about telling a story through photos and words, and this is an example of an ultimate "scrapbook" that tells an important story about humanity. It documents not only how far we have come as a world civilization, but also how far we still have to go. Use the book for discussion in seniors groups (you can read one or two essays at a sitting, and use the essays to spark discussion and memories), in schools (introduce students to some remarkable individuals and generate discussion), and in families with older children and teenagers (use it to provide a balance to current news coverage). Read the essays aloud. Pour over the photos. You will not be disappointed. It's like you're sitting face-to-face across a table with the individuals hearing their personal stories and sharing an emotional connection. You will be inspired. And a portion of the proceeds from each book sold goes to several nonprofit peacebuilding organizations.
The second book I'd like to recommend is Material World: A Global Family Portrait by Peter Menzel. This extraordinary book compares life in thirty nations, in all its similarities and disparities. Sixteen of the world's leading photographers were brought together to create this "world scrapbook." Photographers spent one week living with a "statistically average" family in each country. The centerpiece of each family portrait is a "big picture" photo of the family taken outside their home, surrounded by all their (many or few) material possessions (i.e. all their furniture, appliances, dishes, clothing, etc. were taken outside and displayed around them). At a time of year when many North American children expect gifts and more gifts, this is a great book for sharing and discussion. It brings the idea of being thankful for what you have to a very fundamental level. It puts a human face on the issues of population, environment, social justice, and consumption. Wrote one high school student, "This was a required book in one of my classes. We generally used books in class but could check them out to take home if we wanted. I checked this one out and didn't want to give it back. I think I skipped two classes that day just sitting in the student lounge pouring over it, and I think the people reading over my shoulder probably had other things to do as well. But I couldn't put it down, it was so fascinating."
There are also some great storybooks you can share related to photos and memories. In a new book for the season titled The Night Before Christmas, Raquel Jaramillo illustrates Clement Clarke Moore's famous poem with photos made to look like a scrapbook. In Prayer for the Twenty-First Century by John Marsden, photos and illustrations are combined for a compelling vision of hope for the twenty-first century. Other photo-oriented storybooks include Something to Remember Me By by Susan V. Bosak; Granddaddy's Street Songs by Monalisa Degross; Family Pictures/Cuadros de familia by Carmen Lomas Garza; Grandmother's Chair by Ann Herbert Scott; When I Was Young by James Dunbar; and for a funny twist Amelia Bedelia's Family Album by Peggy Parish.
Activities: Senior Scrapping; The Day Everything Changed; Preserving Your Family Traditions; Preserving Your Family Keepsakes; Holiday Meal Memories; Calendar of Memories; My Book of Memories; Holiday Hunt; 3-D Photo Ornament; Folded Photo Wreath.
Senior Scrapping
Connections: Families; Seniors Groups/Facilities.
What You Need: Family photos; basic scrapbooking supplies like acid-free paper, straightedge scissors, photo-safe adhesive, acid-free pen, stickers, rubber stamps, die-cut shapes, photo-safe album; specialty supplies described below.
Doing It:
Memory Makers magazine recently did a special article about the generation that remembers the black album pages and photo corners of many years ago. More and more older adults are finding scrapbooking to be a rewarding, relaxing activity. It's a way to preserve and share a lifetime of memories. It's something you can do with adult children and young grandchildren. Retirement communities and local seniors community centers often have scrapbooking clubs. Scrapbooking also has therapeutic value for moderately physically and/or cognitively impaired older adults in seniors facilities and nursing homes. It can be used to create a feeling of home, support a failing memory, and as a tool in reminiscing and storytelling (see the Storytelling for Hope section in this kit).
Scrapbooking can be overwhelming at first if you've saved decades of photos and memorabilia in boxes scattered throughout your home. "There I was, 80 years old, with 70 years of snapshots," says Katy Johnston, who lives in Michigan. "How can I do fancy pages for that many pictures?" Katy's daughters, Lynda Bauckham and Peggy Johnston, didn't just get their mom started in scrapbooking; they immersed her in it on a scrapbook cruise to Mexico. While cruising, Katy found in scrapbooking a great new way to stay social and active without bothering her arthritic knee. Scrapbooking also provides a way to preserve memorabilia from moments in her life that are truly historic: "I have the hotel bill from our wedding night," she says, "and it cost all of $7, and that was a ritzy place!"
Scrapbooking can also combine history with emotional therapy. Betty Mihalopoulos, 71, who lives in Florida, wanted to preserve a history few today can remember. After the death of her husband George, she dedicated a memory book to his service for his country, including the several years he spent as a prisoner of war in Japan. "He served our country and he was proud of that," she says. One of her pages is the "American Ex-Prisoners of War" layout. "I think it was therapeutic for George's fellow POWs to see his pages and to talk about what they experienced," she says. "I know it's helpful for me in coping with my losing George."
While it's important to document past times and events when your family is young, the activities and interests that you pursue in your older years are just as worthy of recording in scrapbooks, as the "Sunrise, Sunset" page by Elsie Weller shows. At 80, Elsie, who lives in Alberta, Canada, has longevity in her family on her side. "[My] Mum knitted and crocheted without glasses right up until the day she died at 99 years old." For Elsie, life is one season following another in the lives of the people she loves. That's why she chose the lyrics of the song "Sunrise, Sunset" to tell her family's story.
And husbands and wives can scrapbook together. Mary and Jerry Camacho are always on the lookout for lovely flower gardens to photograph on bus trips in their home state of Kansas, all so they can make kaleidoscope collages for their pages. The precision of making kaleidoscopes and other scrapping techniques is an ideal retirement activity for Jerry, according to Mary. "My husband worked at Boeing and loves to work with rules and magnifying glasses and all the details," she says. "He's so much more precise than I am, so he sits down and makes his calculations and makes the pictures all fit together perfectly. It keeps our brains working."
The Camachos also team up against the aches and pains that can come with age. Jerry has had both knees replaced, and Mary both hips. And Mary battles multiple sclerosis. "When we're scrapbooking, what I don't have the physical strength to do, he does for me," Mary says. "We complement each other."
Getting the whole family involved makes it much easier to get started on scrapbooking projects:
- Set a date each month when young and old can work on organizing photos and starting albums together.
- Give everyone in the family a job. Adult children can help with journaling and identifying dates and people in photos, while young grandchildren may enjoy decorating pages.
- Senior family members can take the lead in not only scrapbooking their own photos, but offering to help create albums for their adult children.
- Start a scrapbooking club that involves both your family and other families to bring young and old together.
Some strategies for dealing with physical challenges:
- Scissors can be difficult for arthritic hands. Fiskars 12 inch paper trimmer or rotary cutter (www.fiskars.com) makes cutting easier. Interchangeable decorative blades are available.
- The constant pounding on punches is hard even on young hands. For easier punching, use a punch assistance tool like Punch Aid by Carl Manufacturing (call 1-800-257-4771 for a store near you who carries it).
- There are an amazing variety of stickers on the market that can help you easily create everything from wild borders to elegant page titles.
- Steady writing is easier with journaling tools like Tapestry in Time's Time Line template (www.tapestryintime.com or call 1-925-449-3205) or a computer.
- Use a tape recorder to keep a verbal journal.
- Partner with a buddy whose physical strengths balance your weaknesses.
The Day Everything Changed
Connections: Schools (History, Language Arts, Art); Seniors Groups/Facilities; Community Groups; Families.
What You Need: Current newspaper and magazine articles and photos (and/or articles and photos about related historical events); basic scrapbooking supplies like acid-free paper, straightedge scissors, photo-safe adhesive, acid-free pen. Optional -- Internet; photo-safe album.
Doing It:
September 11, 2001 -- a date now being referred to simply as 9/11 -- is a day that many say changed the world. There are other dates in history that carry similar weight, such as December 7, 1941, the day Pearl Harbor was attacked.
Students from elementary-age to teenagers can scrapbook current newspaper and magazine articles and photos as a way to work through their often strong thoughts and feelings about September 11. The date is important in young people's life story. As they grow older, they -- and their children and grandchildren -- will value a record of what they experienced and how they felt.
For many older adults, September 11 brought back vivid, unsettling memories of wars past. They are also worried about what will happen to their children and grandchildren. Scrapbooking current articles -- along with any old newspaper articles they may have (e.g. about World War II) -- can help them work through their feelings.
Create a single scrapbook page that captures the essence of your thoughts and feelings. Or, you can make a whole album about 9/11. This scrapbooking activity can be especially effective if young and old are brought together into a group (e.g. a school class with a group of seniors). Children and older adults can work together to create and discuss pages that reflect the ties between past and present, their fears and hopes. They can be a great consolation to each other.
Newspapers may make up a big part of this scrapbooking activity. Prior to the mid-1800s, most newspapers were published on paper made from cotton rags. Many of those newspapers that are still around today tend to be in excellent condition, and show few signs of discoloration or brittleness. But producing newspapers from rags was expensive. Today, wood pulp is used and the quality of newspapers is poor because of wood impurities that remain in the paper after processing. These impurities include lignin (the "cement" that glues plant fibers together). When exposed to light, high humidity, and atmospheric pollutants, lignin promotes acidic reactions in newspaper. Acidity causes the fibers to weaken and break. So, the newspaper deteriorates over time. Here are some tips for preserving newspaper articles:
- Leave a wide margin around articles when you clip them out. Don't forget to cut out the name of the newspaper and the date to include on your scrapbook page.
- Store newspaper clippings flat; never fold them.
- You can add some protection to newspaper by spraying on a light coat of Archival Mist. Spray both sides of a clipping. This is not complete protection, since the newspaper will still be affected by light and oxygen over time and will yellow. Archival Mist deposits a safe, permanent alkaline buffer to protect against future acid attack. The mist will not make the paper wet and it is non-hazardous, non-toxic, and nonflammable. Visit www.webyfl.com for more information.
- Affix newspaper clippings with a small amount of photo-safe adhesive in the corners (avoid tape because it can cause tears in delicate newsprint).
- Instead of trying to preserve the original, you can photocopy articles onto acid-free, lignin-free paper. Make sure the photocopier uses a powder toner. If an article or photo is in color, make a color photocopy to preserve the full effect.
- You can also scan articles, store them electronically, and make prints onto acid-free, lignin-free paper.
Once your scrapbook page is done, remember to store it away from the temperature extremes of an attic or the dampness of a basement, in a cool, dry, dark place.
Preserving Your Family Traditions
Connections: Families; Seniors Groups/Facilities.
What You Need: Photos related to family traditions; scrapbooking supplies like acid-free paper, straightedge scissors, photo-safe adhesive, acid-free pen, stickers, rubber stamps, die-cut shapes, photo-safe album.
Doing It:
As a tool to keep traditions alive, scrapbooking is becoming a tradition in its own right.
As shown in the sample layouts from Memory Makers magazine, holiday traditions are natural to document ("Christmas Traditions" and "My Stocking"). Despite the hectic schedule of her family, Pam Ray of South Carolina is determined not to lose track of her own traditions. She has gone the extra mile to scrapbook about her family's Christmas rituals, from handmade felt stockings to the wreath that decorates the family's Jeep to the weekend journey to cut down the tree. Pam is a third-grade teacher and feels traditions are especially important for children. "All children need something to bind them together, to allow them to feel a continuation of family in generation after generation," she says. "Traditions tie children to their family unit and make each family unique."
Of course, November and December aren't the only months your family celebrates traditions. You can document a year's worth of annual happenings by including one tradition-related photo for each month of the year (as in "Our Family Traditions 1999" by Joyce Feil).
Traditions can be ones that span the generations. For example, Cathy Gireth's grandparents had their picture taken on the same rock in Canada for many years. Cathy and her parents continued the tradition by taking pictures on that rock many years later. Or, traditions can be the simple weekly activities your family enjoys together, like Friday pizza nights.
Some tips for preserving traditions:
- Photograph elements of your tradition. Does the tradition involve special food, activities, or preparation? Photograph all of it at least once.
- Journal. The only way to pass on the reason behind the tradition is through words. Write down the origin of the tradition. When did it begin and why? Don't feel obligated to write out paragraphs of information; bulleted information works just as well.
- Include people. What role does each family member play in the tradition? Even if it's just as the movie "picker-outer" for family night or the babysitter for your traditional date night, include each person's photo and journal about his or her role.
- Incorporate important colors. If specific colors are significant in the tradition, use them in your page design. For example, many families have special colors they wear each year for annual family photos. Make a frame or background to represent the colors. Make sure you journal about the significance behind each person's color of choice. Other traditional colors are passed down through the generations, such as red and green at Christmas or blue and silver at Hanukkah.
- Highlight symbols. Photograph or enlarge symbols closely associated with your traditions. Remember to include a description of their meaning if you know it.
- Talk to older relatives. If the tradition is an old one and its significance is unknown, interview older family members to find out if they know the origin. Include their thoughts and memories of the tradition along with those of younger family members.
Find more information and activities related to traditions in The Magic of Traditions & Rituals and the Memories & Traditions sections of this kit.
Preserving Your Family Keepsakes
Connections: Families; Seniors Groups/Facilities.
What You Need: Camera to take photos of keepsakes; scrapbooking supplies like acid-free paper, straightedge scissors, photo-safe adhesive, acid-free pen, stickers, rubber stamps, die-cut shapes, photo-safe album.
Doing It:
In every family there's a platter used only at Thanksgiving or an ornate silver locket or pair of cuff links that bear mysterious initials. The original owner may be long forgotten and the meaning of the heirloom lost forever.
Creating an album dedicated to your family keepsakes is a way to preserve the stories behind special items. Families can work on this project together, or grandparents can take the lead. This is also something a seniors group can work on over time, or an album a family can give an older adult in a nursing home or other assisted living facility as a way to bring a touch of home to their room.
When Sally Sprinkle Swift's mother died in 1994, she began working on her family's heritage album. As she worked, she realized that many objects and family heirlooms in her home have stories worth recording as well. There is the painting made from a charcoal drawing of her great-grandfather done in 1881 (he died half a year later at the age of 26) and the hand-painted china candlesticks her grandparents received as a wedding gift in 1895. There is the sampler made by her mother in 1928 onto which she painstakingly cross-stitched "Home Is Where The Heart Is." Then there's the carved, wooden eagle which came off an ornate Victorian coffee table her husband found in a dumpster. So, her Treasure Album was born (see sample spread).
The album features photos of 22 items, some old and others relatively new. There are stories, the photos of prized possessions, and pictures of those who owned them. Included in the scrapbook is an assortment of special things Sally herself has created like a quilt and some paintings. Lavender decoupage flowers and hand-painted accents tie the pages together and create a mood of reminiscence.
The album is a work in progress. Sally plans to continue to add to it as new items come into her life. "In the meantime," she says, "I enjoy the pages that are completed and find that I appreciate my special belongings more when they are featured in my scrapbook rather than just hanging on the walls or sitting on the shelves. Perhaps I've become so used to their presence in my home that I often fail to really see them." And when Sally's three daughters inherit many of the family's treasured items, they will know the histories behind them.
Here are some tips for making an album about family keepsakes:
- Gather heirloom items that you have inherited like dishes, linens, furniture, jewelry, and knickknacks. Also include special items you've acquired and plan to pass on.
- Photograph the items. Use a plain background, like a white or neutral-colored bed sheet. Be sure each item is well lit and free of harsh shadows. Experiment with different camera angles to achieve a dimensional appearance. Don't forget to photograph the sides, back, and bottom if they hold special interest.
- Find out the story behind an item. Who acquired it and how? When? Is there a special personal story that goes with the item? If it's an item that has fallen out of use, such as a tool, explain its function.
- Include photos of the people who originally owned an item, like a great-grandparent or favorite uncle. Put the item into the context of their life.
Find more activities related to keepsakes in the Crafts & Keepsake Gifts section of this kit.
Holiday Meal Memories
Connections: Families; Seniors Groups/Facilities.
What You Need: A special holiday recipe; photos related to a special recipe; scrapbooking supplies like acid-free paper, straightedge scissors, photo-safe adhesive, acid-free pen, stickers, rubber stamps, and die-cut shapes.
Doing It:
Holidays are the time of year when special recipes come out of the drawer -- Grandma's honey cookies or Aunt Ginny's gingerbread. This holiday, get everyone together to help capture that special recipe and make a scrapbook page that can be a keepsake on its own or the start of a keepsake cookbook. It's a great way to honor the cooking skills of an older relative and ensure their recipes aren't lost forever. This is also an activity that can be done in a seniors facility, where residents and young visitors make favorite recipes as staff snap photos, and then young and old collaborate on creating a scrapbook page to document the event.
Kathy Steligo, who wrote the book Meals and Memories: How to Create Keepsake Cookbooks, describes herself as a "fanatic scrapbooker and a fanatic cook. I was looking for a way to combine the two." In the kitchen with her Sicilian mother-in-law, something clicked. "Every time I would cook with her, she told me wonderful stories about how she remembered cooking the same thing with her mother. It struck me that these recipes and stories were an important part of her family heritage."
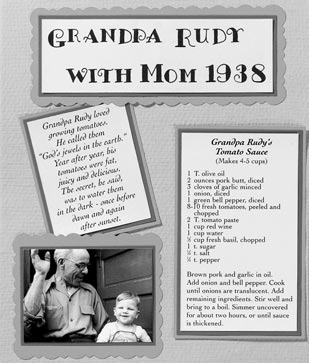
The elements that make a recipe -- and your scrapbook page -- come alive are the photos and written memories you include with it. But don't forget when you're formatting a recipe to include a title, yield, list of ingredients with measurements (many long-time cooks prepare a recipe by feel, so you may have to try out a family recipe a couple of times together before you get the exact measurements recorded), and preparation instructions. Optional items such as serving suggestions, ingredient substitutions, and storage information can also be helpful.
The sample page has the recipe for Grandpa Rudy's Tomato Sauce, an old photo of Grandpa Rudy, and some personal recollections. Another way to do up a page is to photograph a recipe-making session in the present -- the whole family gathered to learn how to make blintzes from Bubbe, for example.
A single recipe page will become a keepsake of this holiday. If you decide to compile a keepsake cookbook over time, you can choose a theme -- seasons, holidays, favorite foods, special event, special person -- and go from there.
Connections: Families; Schools (Art, Language Arts, Social Studies); Seniors Groups/Facilities; Community Groups.
What You Need: Copies of a printable wall calendar; family photos (duplicates or color photocopies); scissors; photo-safe adhesive; acid-free pen; pencil crayons and/or markers; hole punch; heavy paper; yarn or ribbon.
Doing It:
Many different calendars are followed throughout the world. But the one we generally use is based on the calendar in which Julius Caesar designated January 1 as the first day of the year. Janus (from which January comes) is a Roman god portrayed with two faces. One face looks backward at the old year, and the other face looks forward at the new year. So, a calendar is a very appropriate way to link the past, present, and future.
Parents, and especially grandparents, usually have everything. It can be very difficult to give them a useful, meaningful gift. My mother is particularly difficult to buy for. One year, we decided to create a wall calendar for her using old family photos from when my brother and I were children. JACKPOT! It was the best gift we ever gave her. She gushed and gushed when we first gave it to her. Then, every month, we'd get another gushing phone call from her saying how much she was enjoying the calendar and reminiscing about the photo(s) for the month. And, believe it or not, although that particular year is long gone, my mom still has that calendar on the wall.
Making a calendar is something even young children can do. It's a great gift for grandparents, particularly those who live far away. It's also an item than can brighten the room of an older adult in a nursing home and keep them connected to their family. And grandparents can even make a calendar for their grandchildren, perhaps using old family photos and supplying a few notes about family history each month.
Use the wall calendar pages as your base. You can do the entire year at once, or do a month at a time (each month could be mailed to a grandparent or grandchild separately, giving them something to look forward to and encouraging regular contact -- everyone, young and old, loves mail!).
For the completed wall calendar, you can start by printing the calendar pages onto heavy paper. Then, create family photo layouts on the back of the appropriate month (i.e. January photo layout is on a blank page which later becomes the cover, February photo layout is on the back of the January calendar page, March photo layout is on the back of the February calendar page, etc.). OR, you can do all your creative work, and then make double-sided, color prints of the photo layouts and months onto heavy paper. In either case, you may want an extra color copy as a keepsake for yourself.
Very young children can simply create a hand-drawn picture for each month using pencil crayons and/or markers. Older children, teenagers, and adults can create a photo layout page for each month using family photos. Use duplicates or color copies of photos. You may want to develop a specific theme for the entire calendar (e.g. using photos from when grown-up children were young), mix older photos with newer ones (e.g. do a comparison of old and new for each month), or relate the photos to a holiday during the month (e.g. photos of old Halloween costumes for the month of October).
Write important family dates (e.g. birthdays, anniversaries) into the date squares. You can also get creative (as in the sample of the fancy calendar month): integrate in some photos over selected date squares and/or make "doors" for date squares to hide a surprise photo, a quote, an "I love you," or a special memory related to the date.
Design a cover page (on the other side of the January photo layout page) that captures the essence of your calendar's theme. Include "To" and "From."
When the calendar is all done, punch three holes along one edge of the pages and use brightly-colored yarn or ribbon through the holes to fasten the pages together. Tie the yarn or ribbon into a loop. Make the loops large enough so that the calendar pages can be flipped easily from month to month, but not so large that there's a big gap between the top and bottom of the calendar. Enjoy your year!
My Book of Memories
Connections: Families (seniors facilities can also suggest this as a meaningful gift).
What You Need: Family photos; basic scrapbooking supplies like acid-free paper, straightedge scissors, photo-safe adhesive, acid-free pen, stickers, rubber stamps, die-cut shapes, photo-safe album.
Doing It:
When my grandmother was in a nursing home, one group of family members gave her jelly beans as a gift one Christmas. Here was a 100-year-old woman who was missing some of her teeth and eating a soft-food diet, and they gave her jelly beans! The rest of the family enjoyed eating the jelly beans, but my grandmother would have enjoyed something more appropriate. An album full of photos of family members and special times is a wonderful gift for an older adult in a nursing home. If the person has some cognitive impairment, this kind of book can also have a therapeutic benefit in stimulating memory and helping to keep them connected with their family.
The album should be very basic, with large photos (one per page) and big, bold lettering. Make the album as bright as possible, because the ability to distinguish colors diminishes with advanced age. The album should include a photo of each family member and a description of their relationship to the person (i.e. Your Daughter Marilyn, Your Husband Joe, etc.). Include the person's parents and grandparents if possible (my grandmother repeatedly asked about her husband, and then her father and mother as she became more confused). The album should also include photos of the person when they were younger. Toward the end of the album, put in a few photos of an old family home, holiday festivities, and a special birthday or anniversary party. Be very selective in choosing these photos because too many images will overwhelm the person.
This book of memories should be kept near the older adult's bed. It can be a reminiscing tool facility staff can use with the resident to help them on a daily basis, and a source of comfort if the resident is feeling lonely or is agitated. Family members can also use the book to fill time when they visit. Sitting, talking, and looking through the album together can be done again and again.
You can combine this activity with the "Fill-in-the-Blanks Life Story" in the Storytelling for Hope section of this kit.
Holiday Hunt
Connections: Families; Seniors Groups/Facilities; Schools (Language Arts, Art, Social Studies); Community Groups.
What You Need: Camera; paper; pen/pencil; basic scrapbooking supplies like acid-free paper, straightedge scissors, photo-safe adhesive, and acid-free pen.
Doing It:
This holiday season, the hunt is on for great family photos! Send young people on a holiday photo "treasure" hunt where they creep around their living room and stalk the dinner table, just waiting to snap the right moment. This is a great activity to involve children in holiday preparations and celebrations, and help them develop their photo-taking skills.
Grandparents, even those who live far away, can take the lead by writing up a list of the photos they would like grandchildren to try to get (photos can then be sent to grandparents). Older adults in nursing homes can make up photo lists for their families; they may want a photo of a particular local store they remember as having elaborate holiday decorations, displays in a favorite bakery, or holiday lights (a tip: taking photos right after sunset gives better results than full darkness). If a seniors facility or community group is hosting a special holiday event, getting children to snap photos can keep them entertained and provide a lasting record of the event. Teachers can even write up a holiday photo list to get students to take photos which can then be used to compare the holiday celebrations of different families, cultures, and religions.
Start by making a list of the holiday happenings and items to photograph. Items on the list can include: decorated tree or fully lit menorah; ornaments and holiday displays; wrapping presents; baking cookies or making other holiday foods; writing Christmas cards; holiday services; holiday dinner table; each person with their favorite present; people modeling clothes received as a gift; building a snowman. Add other items that are specific to your family's holiday festivities, and encourage children to add their own ideas to the list.
Once the list is ready, a disposable camera is ideal for first-time photographers to use. Or, wrap up a beginner's camera for a child to open as an early holiday gift.
Encourage children to take more than one photo of each item on the list so that they can choose the best photos. Try different angles and distances.
When the hunt is over and the photos have been developed, children can create holiday hunt scrapbook pages. Make sure they include the list of the items and a few other notes about their photo adventures. Children can then share their completed pages with family members and classmates.
3-D Photo Ornament
Connections: Schools (Art); Families; Community Groups.
What You Need: Duplicates or color photocopies of one to four special photos; copy of ornament pattern; construction paper; pencil; pencil crayons and/or markers; scissors; ruler; glue; tape; hole punch; thread. Optional -- circle template (to cut the photos).
Doing It:
Children can make a special 3-D holiday ornament for a parent, grandparent, or grandfriend (a nice gift to give older adults in nursing homes or assisted living facilities).
Make a copy of the ornament pattern supplied and cut out the ornament shape. Use it to trace two ornament shapes onto construction paper (choose an appropriate holiday color). Cut out the shapes.
The completed ornament will hold four photos. You can put a copy of the same photo into each of the four spaces, or use four different photos. Cut the photos into a circle to fit into the ornament.
Glue one photo onto the front of one ornament shape and another photo onto the front of the other ornament shape (put aside the remaining two photos for a moment). Write the year in fancy numbers on the front of each ornament shape, underneath the photos.
Lay the ornament shapes on top of each other, and punch a hole in both at the same time (i.e. so that the hole is in exactly the same spot on each ornament shape).
Lay a ruler down the center of one of the ornament shapes (over the photo). Gently fold over the shape so that it's bent in half at a 90 degree angle. Repeat with the other shape. Take your remaining two photos, lay a ruler down the center of each, and gently fold them over so that each is bent in half at a 90 degree angle.
Place the two ornament shapes together, along their folds, and use small pieces of tape to secure the two pieces together. Take the remaining photos and glue them into the two open spaces, over the tape.
After you tie a loop of thread through the hole, your 3-D ornament is ready to hang.
Folded Photo Wreath
Connections: Schools (Art); Families; Community Groups.
What You Need: Step-by-step illustrations; 5 x 7 inch duplicate of a favorite photo; colored, lightweight paper (red is very festive); sheet of heavy paper; compass; ruler; scissors; pencil; photo-safe, double-sided tape (to put the wreath together and secure photo to back of completed wreath); gold ribbon (for a bow).
Doing It:
With a few strategic folding maneuvers you can create a beautiful, 3-D holiday wreath that frames a favorite photo. This makes a fancy gift for a parent or grandparent.
The craft of tea bag folding -- which incorporates small squares of paper about the size of a tea bag, folded and layered -- is finding its way into scrapbooks. Tea bag folding got its name from a Dutch woman named Tiny van der Plas in 1990. Tiny was trying to come up with a unique way to accent a homemade card, when she decided to try something new with decorative tea bags. After a few tucks and folds, the art of tea bag folding was born.
Beginners can practice the folds on large square pieces of paper first. Then, try your hand at the wreath by following the step-by-step illustrations provided. The fold itself is really quite simple. It's putting the pieces together that makes the final creation something extra special.
If you'd like more unique folding ideas, take a look at the book Memory Folding from Memory Makers magazine (www.memorymakersmagazine.com or 1-800-366-6465).
---------------------------------------------------------------------------------------
From Holiday Activity Kit by Susan V. Bosak ©2003
www.legacyproject.org
---------------------------------------------------------------------------------------